Infinity Pool Construction: Stages from Site to Finish
Infinity pool construction step by step: site checks, hydraulic sizing, structural basin, the level weir, waterproofing, plumbing and commissioning tests.

Most advice about infinity pool construction starts in the wrong place. It starts with the view, the tile sample and the shape of the deck. That order is backwards.
By the time anyone lays a coping stone, most of the money and nearly all of the risk are already underground: a surge reservoir sized against swimmer displacement, a concrete wall designed for the outward push of water, a trough set dead level across 24 feet, and plumbing that must be pressure-tested before it vanishes under tile. What separates an infinity pool from a standard pool isn't the finish or the setting. It's a controlled overflow edge, a receiving basin, and enough return capacity to keep a thin sheet of water moving in two directions at once. Get those right and the edge looks effortless. Get them wrong and no amount of glass mosaic rescues it.
The Infinity Pool Build Sequence at a Glance
An infinity pool is an engineered recirculating system, not a pool that spills water away. Water crosses a lowered, precisely level weir, drops into a separate catch basin or trough, and a pump returns it to the main pool, round and round for as long as the effect is running. The idea has a long pedigree. The documented history of the infinity pool traces an early modern precedent to the Stag Fountain at France's Palace of Versailles in the late 1600s, credits architect John Lautner with a pioneering residential vanishing-edge design in the early 1960s at his Silvertop residence in Los Angeles, and dates the move into ordinary construction systems to 1990 for concrete work by Phillips of Questar Pools & Spas, 1994 for an early vinyl-liner version and 1998 for an early fiberglass shell.
Concrete, vinyl or fiberglass, every version still leans on the same four parts: a controlled overflow edge, a receiving basin, hydraulic return equipment and accurate structural detailing. That's why the build order runs from the ground up, and why the visible edge is the last stage rather than the first.
| Stage | Main output | Check before moving on | Usually led by |
|---|---|---|---|
| Site evaluation | Soil, slope, access and utility map | Geotechnical report and surveyed elevations | Geotechnical engineer and builder |
| Hydraulic design | Water level, catch trough, surge volume, pump size | Surge storage and return capacity calculated | Hydraulic designer |
| Structural design | Wall, bond beams and basin drawings | Engineer-stamped drawings and permit approval | Structural engineer |
| Basin and wall construction | Reinforced concrete shell with embedded penetrations | Concrete placed, consolidated and cured to specification | Concrete crew under engineer's regime |
| Edge and trough forming | Level weir and receiving trough | Lip set 2-6 mm below water level and laser checked | Experienced finish crew |
| Waterproofing | Continuous membrane across basin, wall, trough and joints | Leak and circulation test before finishes | Waterproofing installer |
| Plumbing and equipment | Suction, return, makeup water and pumps | Pressure test before concealment | Licensed plumber and electrician |
| Finishing and commissioning | Tile, coping, deck and controls | Water-level and pump-failure tests pass | Builder with homeowner sign-off |
Sort these checks into two piles. Some you can watch with your own eyes: the painted level line on the wall, the trough dimensions, the even sheet of water during the flood test. Others you can only accept on paper, because they need a geotechnical report, an engineer's stamp, a laser survey sheet or a pressure-test log. Ask for those documents by name at handover. A builder who has them will hand them over without blinking.
What an Infinity Pool Costs by Stage and Scope
A single budget number for an infinity pool is close to useless, because published figures measure different things. Fixr's 2025 cost report prices a 12-by-24-foot pool together with its decking, stairs, fencing and landscaping, and lands the installed total in six-figure territory. HomeGuide's 2025 numbers sit in the same neighbourhood: a $105,000 average total cost, an average range of $60,000 to $150,000, and $100 to $300 per square foot installed (HomeGuide).
Then there's the edge itself. An acrylic pool edge that resembles an infinity design typically adds $10,000 to $20,000 to a project (Raleigh Realty).
| Source and year | Figure | Scope |
|---|---|---|
| Fixr, 2025 | Installed totals reported in the six-figure range | 12-by-24-foot pool with decking, stairs, fencing and landscaping |
| HomeGuide, 2025 | $100 to $300 per sq ft installed; $105,000 average total | Average range $60,000 to $150,000 |
| Raleigh Realty, 2024 | $10,000 to $20,000 added | Acrylic pool edge resembling an infinity design |
Run the arithmetic and a gap appears. A 12-by-24 footprint is about 288 square feet, so the quoted per-square-foot rate implies $28,800 to $86,400 for the pool alone. The $105,000 average total overshoots the top of that band, and the $150,000 high end climbs far past it. The explanation is straightforward: per-area rates get quoted for the shell and finish, while the totals carry the site work, the edge structure and everything around the water.
That gap is where the hidden costs of an infinity build live. The surge tank, the weir wall, the oversized plumbing and the waterproofing membrane are exactly the items a lump quote can bury, and they are the items that decide whether the edge works.
Practical takeaway: ask for a quote broken into line items for the hydraulic package, the structural wall, the waterproofing system and the edge upgrade. When a number arrives as one lump, you can't tell whether the surge tank was priced properly or skipped entirely. Itemised quotes also let you match each cost to the stage that creates it, so a later change order has a baseline to argue against.
How to Evaluate the Site Before Design Is Final
Site conditions decide the design long before taste gets a vote. A slope gives you the view the edge is built for and simultaneously forces a retaining structure, deeper footings and a catch basin hang schedule. Flat ground gives you none of that drama for free. Work through this list with your designer, in order, and don't let the conversation drift to finishes until it's done.
- Get a geotechnical report. Soil type, bearing capacity and groundwater depth all change the basin and waterproofing cost. A high water table means the basin wants to float when it's empty, which changes the structural design completely.
- Survey existing grades and mark the house finish floor. The weir elevation is set against the ground and the sight line from the main seating area, not against the pool deck. Get this wrong and the edge cuts the horizon in half.
- Check drainage direction. Runoff from the pool, deck and trough must flow away from the house and away from the base of the infinity wall. A deck that ponds against the wall finds every weakness in the waterproofing.
- Measure lot width and rear setbacks. A surge tank and equipment pad have to fit somewhere, and on a narrow lot they compete with usable yard. Sometimes the answer is burying the tank under the deck.
- Confirm truck and excavator access. A narrow side gate can force hand excavation, which changes the schedule and the price. Walk the machine path on site, not on a plan.
- Call 811 for utility locates before any digging. Then have the builder pothole the line crossings by hand where the basin will sit.
- Note sun exposure and the neighbours' sightlines. Which way the edge faces, where the afternoon sun lands, and who can see the pool from a second storey all shape the layout.
A scenario worth picturing: a sloped rear yard in inland California, where the designer raises the edge side by three feet, pushes the surge tank into the space under the new deck, and uses the retained soil as the base for the equipment pad. Nothing about that solution comes from a catalogue.
Practical rule: if the site report and the design disagree, the site wins. Redesign is cheap at this stage and brutal after concrete.
Bring four things to the first consultation: the plat or survey, any geotechnical information you already have, photos of the yard from the house looking out, and a realistic budget range including landscaping. A design drawn without a budget number tends to come back needing one.
Sizing the Hydraulics Before Drawing the Structure
The finished water level comes first. Everything else in an infinity pool hangs off that one elevation: the weir height, the trough depth, the surge volume, the return pump curve, the makeup-water set point and the filtration loop. Draw the structure first and the hydraulics get bent to fit concrete that's already poured. Draw the hydraulics first and the structure has a specification to satisfy.
California public-pool guidance is a useful engineering benchmark even when the project is a private residence. The county pool code book used in California plan review requires perimeter-overflow systems to accommodate at least 1 gallon of surge storage per square foot of water surface area (40.75 L/m²), with overflow piping able to restore skimming within 10 minutes of a sudden displacement. The same rules want the overflow channel integrated with the structure, at least 3 inches deep and 3 inches wide at the bottom, and accessible for inspection and cleaning.
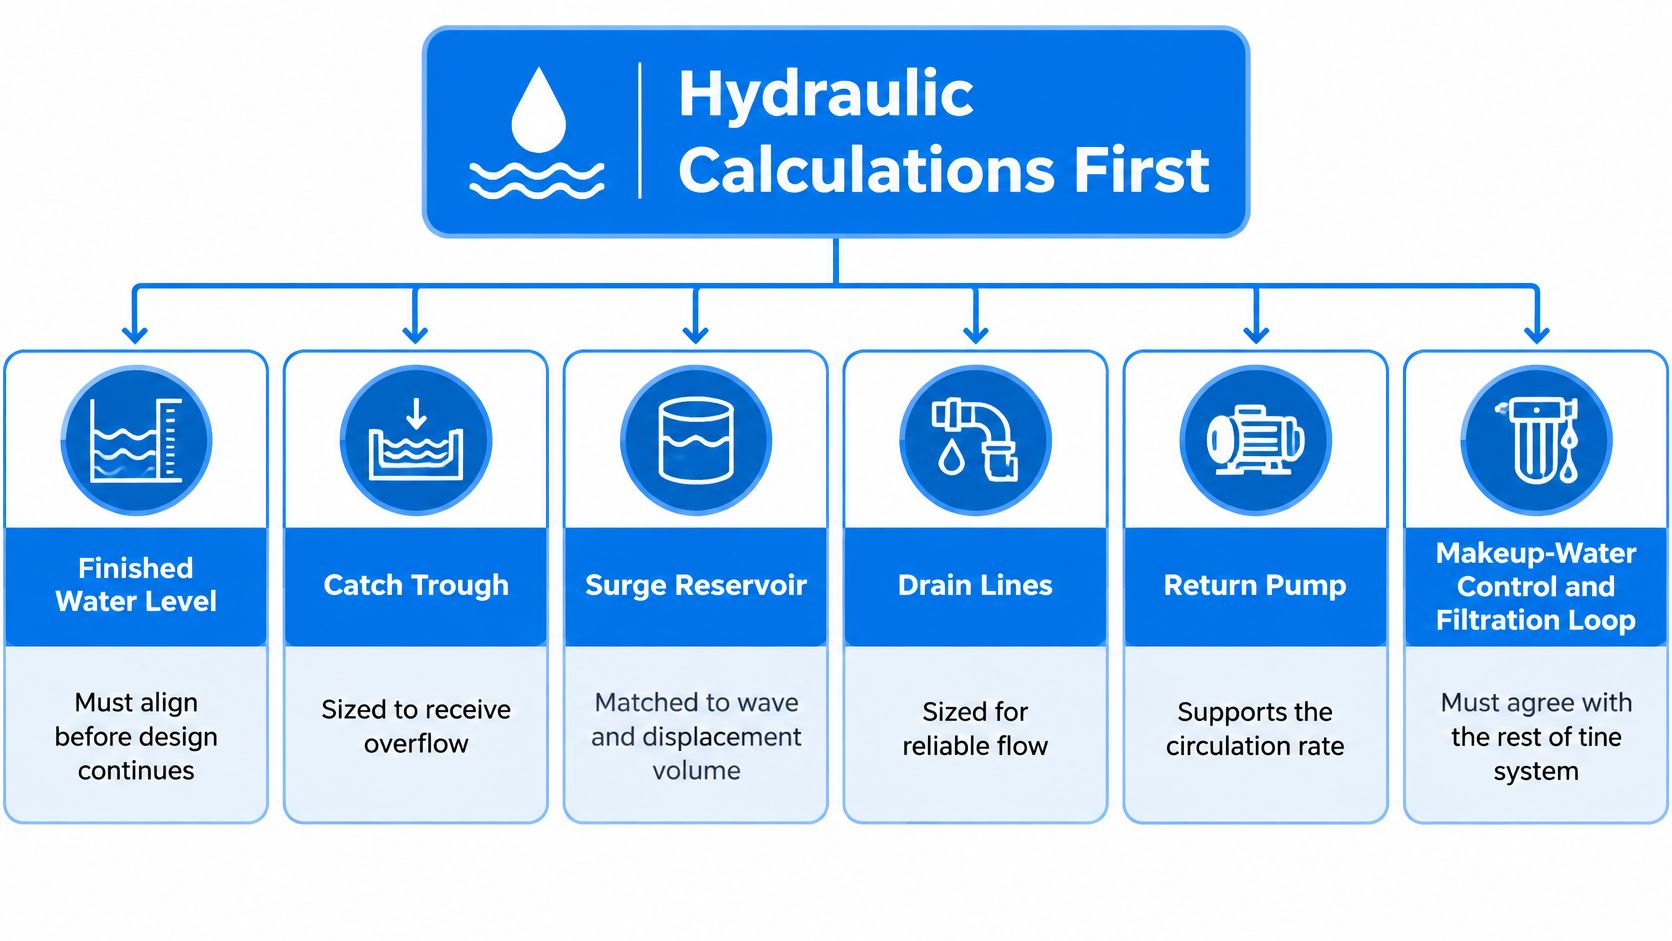
A worked example for a 12-by-24 pool
Take the common 12-by-24 footprint, about 288 square feet of surface. At 1 gallon per square foot, the surge reservoir needs at least 288 gallons of usable capacity before you choose a trough profile or a pump. Six people stepping in at once displace a meaningful share of that in a couple of seconds. So does a summer downpour hitting a raised edge, and so does a party where nobody gets out for an hour.
That number is the floor, not the target. On a windy site, or an edge that faces an open view with nothing to break the breeze, I would size above it. Water blown clear of the basin never comes back, and the makeup line replaces it for the rest of the season.
| Design item | Reference value | Why it matters |
|---|---|---|
| Surge storage | At least 1 gallon per sq ft of water surface (40.75 L/m²) | Absorbs displacement from swimmers and rain |
| Skimming recovery | Restored within 10 minutes after sudden displacement | Keeps the edge running during heavy use |
| Overflow channel size | At least 3 in deep and 3 in wide at the bottom | Carries flow and allows inspection and cleaning |
| Suction outlets | Split, hydraulically balanced outlets on each pump suction line, or an approved alternative | Reduces entrapment risk and keeps flow moving if one outlet blocks |
Suction-outlet rules differ between jurisdictions, so have the designer confirm the arrangement and spacing with the local plan reviewer before the trough is formed. What matters hydraulically is that a single blocked outlet can never starve the pump or leave the weir running dry.
Sizing rule: the surge basin is a reservoir, not a drain. If your designer describes the trough as a linear drain, stop and get the calculation in writing.
Undersizing is the classic failure and it shows up in three ways. The edge runs intermittently because the pump pulls the basin dry. The waterproofing transition at the top of the trough gets exposed to air and sun and starts to fail. Or the deck floods the first time several swimmers climb in together. All three are cheap to fix on paper and expensive to fix in concrete.
How to Build the Basin, Wall and Waterproofing
The infinity wall is a retaining structure that holds water on one side and air on the other. Build it in this order and each step protects the one after.
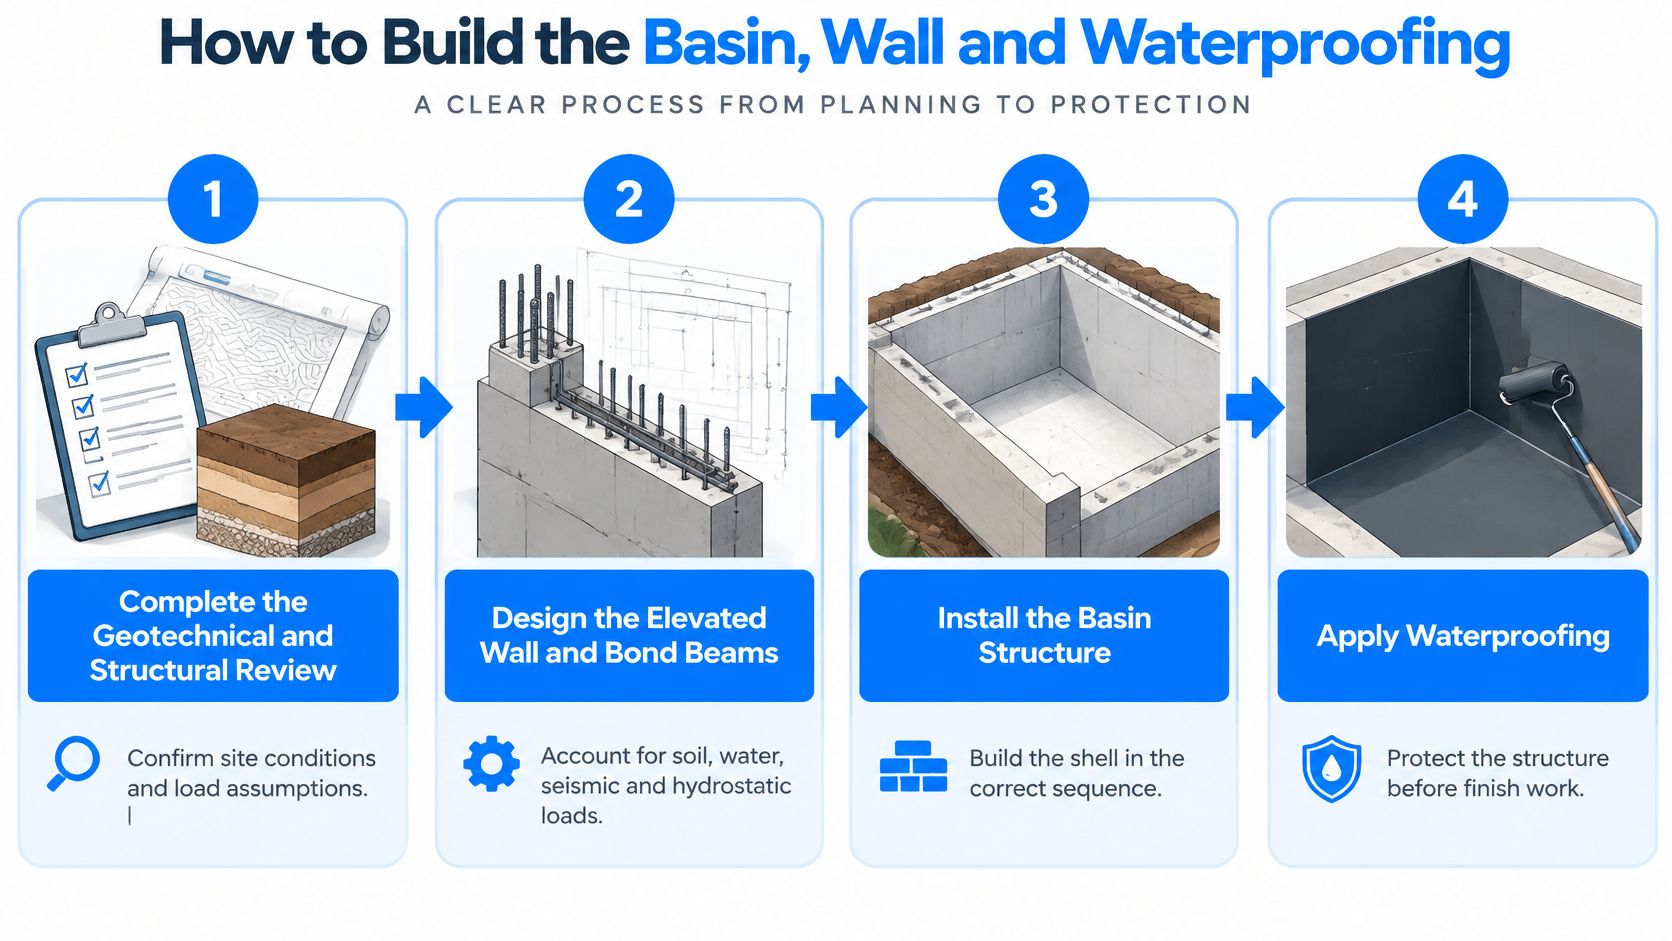
- Complete the geotechnical and structural review. No drawings leave the office until soil, groundwater and slope stability are known. Hillside projects require caissons and grade beams.
- Design the raised wall and bond beams for soil, hydrostatic, seismic and water loads. The wall carries water pushing out and soil pushing back, and in California it carries seismic demand as well.
- Install reinforcing steel and embedded hydraulic penetrations. Route sleeves and pipes so they clear the rebar rather than crowding it. A pipe that forces a rebar to move weakens the section it passes through.
- Place and consolidate watertight concrete. Watertightness is won or lost during consolidation around penetrations and at construction joints, and it's invisible forever after.
- Cure under the engineer's regime before loading the wall. Backfilling early or filling the pool early loads concrete that hasn't reached design strength.
- Form the trough and edge to tight elevation tolerances. Covered in detail below, but the short version is that the lip is set in millimetres, not inches.
- Apply the specified waterproofing continuously across the basin, wall, trough, penetrations and movement joints. Continuity matters more than product choice. A perfect membrane with an unsealed penetration is a leak with extra steps.
- Run leak and circulation tests before finishes conceal the work. Once tile is glued, every investigation costs tile.
California's Health and Safety Code article 2.5 on pool safety requires either two hydraulically balanced suction outlets per pump, separated by at least 3 feet, or an approved alternative such as skimmers or perimeter-overflow collection. That allowance is exactly why an infinity pool can be built safely, and exactly why the surge tank and trough need the same antientrapment thinking as the main pool. They introduce additional suction points, access points and places for a person to become trapped.
Where this phase goes wrong
The mistakes cluster. Plumbing crowded against reinforcement is one, and it's usually a coordination failure between the plumber and the steel crew rather than bad intent. Unsealed penetrations are another, along with movement joints that get bridged by a finish and then crack. Tile grout treated as the primary waterproofing layer is the third, and it's the most expensive because the failure appears two seasons later, when efflorescence stains the wall and tile starts to delaminate. The same membrane logic that governs pool resurfacing options applies to a new build: the waterproof layer is a system, and the tile is a wearing surface sitting on top of it.
Two more that never make it into brochure photos: omitting overflow capacity for simultaneous swimmers and rainfall, and failing to provide maintainable access to the pumps and the surge tank. A tank with a bolted lid and no clearance around it is a maintenance problem for the next twenty years.
Get the detail from engineered drawings and the locally adopted code, not from a generic plan set. What works on flat ground in one county can be wrong on a slope two hours away.
Forming the Edge to Millimeter Tolerances
The weir is the only part of an infinity pool that every guest inspects without meaning to. The work at this stage comes down to two requirements: hold the overflow lip just below the set water level, and hold it level along the full run of the edge. No trim piece or tile pattern hides a low spot. Water finds it immediately.
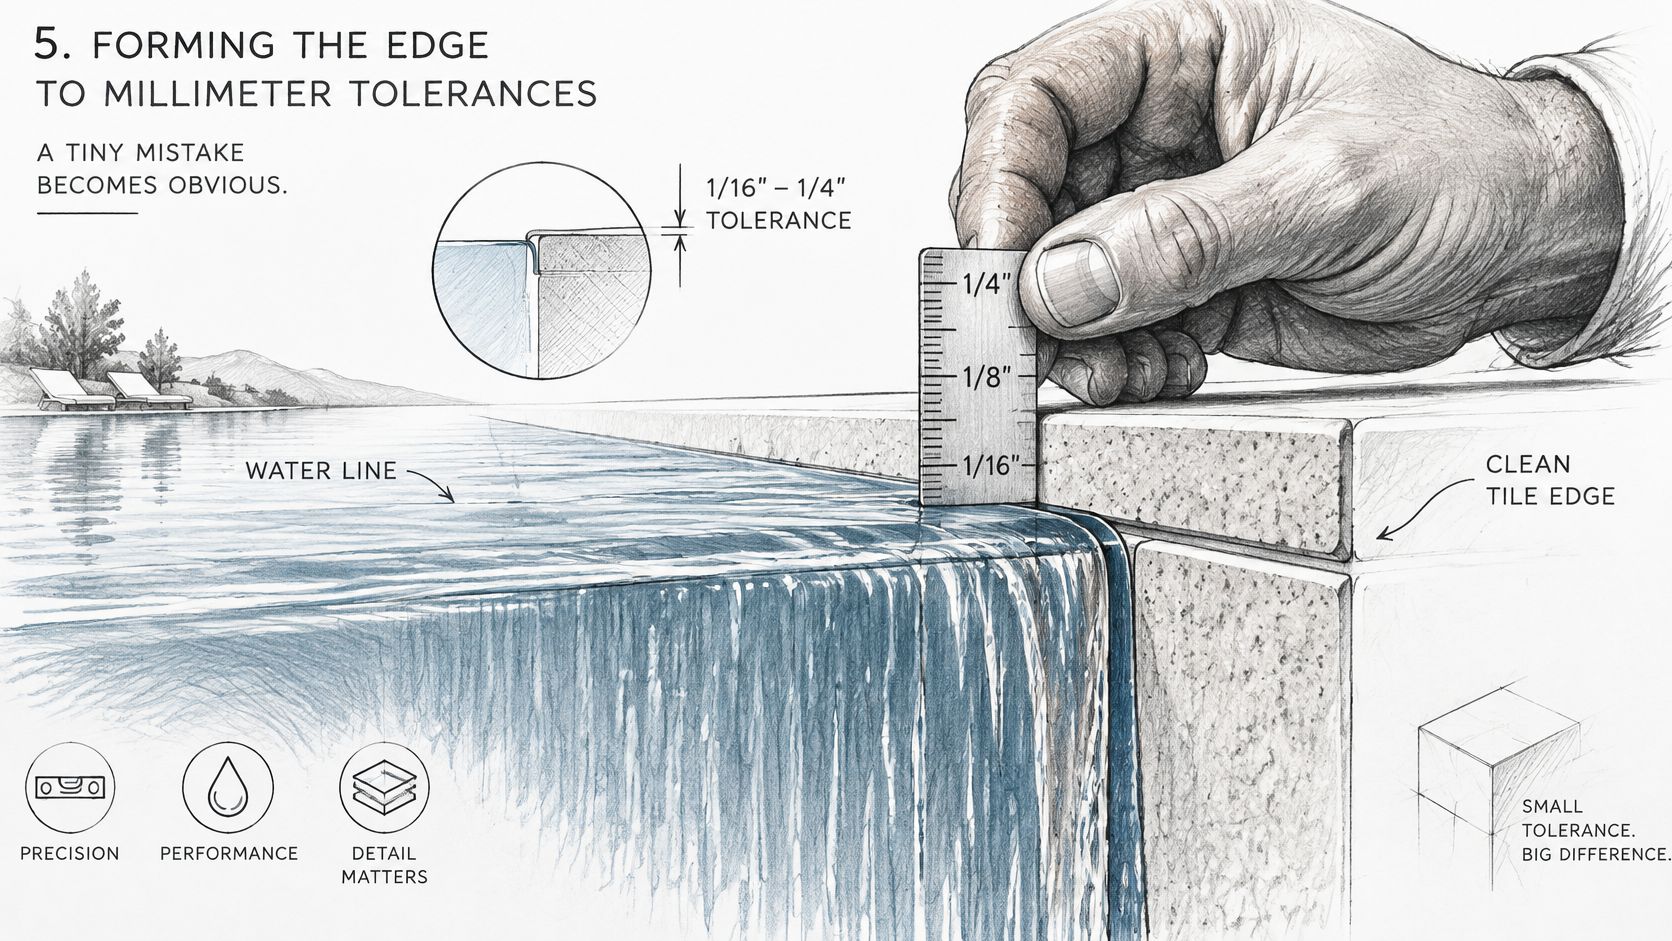
Millimetres decide the result. Take a 24-foot lip as an example: if one end sits 4 mm lower than the other, water concentrates at that end, the rest of the edge barely flows, and the illusion reads as a leaking wall. Spread that same small drop evenly along the length and the edge produces a clean, silent sheet. Same wall, same tile, completely different outcome.
The edge also carries structural load, so treat it as structure rather than trim. A municipal structural calculation package for a vanishing-edge pool uses water's unit weight of 62.4 pounds per cubic foot and treats the edge wall as subject to outward fluid pressure. That load is why the wall gets engineered on paper before it gets formed on site.
Getting the edge wrong is the expensive version of a cheap check. Regrinding or re-forming a lip after the membrane has cured means breaking into finished work. The proving check for the whole stage is a laser reading taken before the finish conceals the trough, and it costs almost nothing compared to the fix.
How to check level without guessing
Set a water-level reference first, mark it on the shell in a place that won't be tiled over, and photograph the mark. Then transfer that reference with a laser level to at least five points along the trough, including both ends and the middle. Correct any deviation before waterproofing, and check again after the membrane cures, because a membrane laid thick at one end shifts the trough by more than you'd expect.
| Edge check | Reference value | How it is verified |
|---|---|---|
| Overflow lip below water level | Just below the set water level | Laser level transferred to several points on the trough |
| Level across full edge length | Held level end to end | Repeated laser readings along the full length before and after waterproofing |
| Edge wall structural load | Water unit weight of 62.4 lb per cubic foot | Structural calculation treats the wall under outward fluid pressure |
| Edge recheck after membrane | Same level held after curing | Final laser check once the membrane has cured and the trough is fixed |
Eyeballing a 24-foot edge from standing height misses dips the water will find on the first fill.
One design distinction to settle before the edge is formed. A true vanishing edge sends water into a hidden basin and recirculates it, while a decorative spillway pours into the pool or a visible catch and does nothing for the vanishing effect. If what you want is the sound of falling water, these pool water feature ideas covering sheers, scuppers and waterfalls cost far less and demand far less precision.
Plumbing, Tests and Acceptance Before Handover
The expensive leak in an infinity pool usually announces itself after the trough is tiled. Water finds the joint where the edge wall meets the basin, the finish comes back off, the membrane gets reworked, and the schedule slips. The cheaper version is boring: prove every hidden layer before it gets covered.
Run the tests in the order the risk gets buried. Pressure-test the suction and return lines before backfill. Photograph every routed pipe while it is still visible, with a tape measure in frame. Flood-test the basin and trough to verify membrane integrity. Only then set tile and coping, pour the deck, and commission the equipment.

Treat the handover file as a build deliverable. Before final payment, it should contain:
- Pressure-test records for every line, held on file so a later fault has a baseline to compare against.
- Photographs of pipe routes before concealment, so a future repair stays a repair instead of exploratory demolition.
- Labelled valves and shutoffs, with a simple diagram fixed inside the equipment pad.
- Licensed electrician sign-off on pumps, controls and lighting.
- Automatic makeup water protected by an air gap or approved backflow device, since a makeup line tapped straight into a potable supply is a cross-connection.
- Secure lids, cleaning access and working clearance around the surge tank and pumps.
Acceptance then comes down to five commissioning checks, in this order:
- Water-level test. Confirm the edge sheets evenly across its full length, with the pumps running at normal speed and at low speed. Weak or broken sections of the sheet point back to trough level, return flow or the lip itself.
- Pump-failure simulation. Kill power to the edge pump and watch the shutoff logic, the overflow drainage and the basin level. The surge tank has to absorb the water still travelling over the edge without overspilling or pulling the basin below its operating mark.
- Measure makeup water for about a week. Run a bucket test alongside it to separate evaporation from leakage, because a slow leak on a hot week reads exactly like evaporation once the top-off is automated.
- Verify barriers and suction protection are installed and documented as part of the permitted design.
- Get a written operating plan for power outages, drought restrictions and disabling the edge if circulation fails.
Compliance belongs in that same conversation. Pasadena's residential swimming pool requirements call for an approved barrier and at least two specified drowning-prevention features on a new or remodelled residential pool, with circulation and suction safety addressed in the permitted design. Overflow drainage, leak alarms, shutoff logic and equipment access are design decisions made early, and they cost less there than they do after the deck is poured.
An infinity edge can work in a hot, windy inland climate. The practical version often runs the edge selectively, when people are using the pool, rather than pouring a sheet of water into dry air all day. I would ask the designer to price the automation that makes that easy, and compare it against a smaller visual spillway if water use is the priority.
Bakersfield Pool Build works with you from the initial design concept through the final installation, and offers a free consultation and estimate for homeowners across Kern County. The fastest way to reach the team is 661-378-0220; if no one picks up, send a message through the website contact form.
Bakersfield Pool Build designs and installs custom infinity pools across Bakersfield, Kern County and the surrounding areas, planning the surge tank, the edge wall and the hydraulics as one system so the visible sheet of water is the last decision rather than the first. The free consultation covers budget, backyard space and how you want to use the pool, with 3D renderings so you can review the layout before excavation begins. Visit Bakersfield Pool Build to start the conversation.
Enhanced by the Outrank app